By Larry Pollis KI5UXC
Back in the stone age days (circa 1976) of my ham radio journey I built my first HF Transceiver. It was a Heathkit SB-104A, the first all solid-state transceiver with a digital frequency readout. Along with that kit, you had to build the power supply and speaker to get functional. Additional options for the SB-104A lineup were a station monitor (a limited ‘scope), a phone patch (what’s that? Unheard of now!), and the SB-230 linear amplifier. It was also ahead of its time. It’s output was 1200 watts peak to peak SSB and 1 kilowatt on CW and it used a single, conduction cooled, final tube.
After a 30 year hiatus from amateur radio I returned to a different world. There is no Heathkit. Kit building was the norm back then and not only for ham gear. I built many pieces of test gear, stereo amplifiers, weather stations… The list goes on. I thought that my kit building days were over. Much of the technology has moved on to more sophisticated manufacturing methods that are not home-brew friendly such as surface mount technology, multi-layered PC boards, and ultra-miniature components. I thought that the “Thrill of the Build” was gone!
Then I discovered that I was wrong! I was reading something on the internet and an item caught
my eye. It was a mention of a SWR/Watt Meter that was offered as a kit. That prompted a deeper
search and I found that there were many, many opportunities still available to hams! (See the list
at the end of this article.)
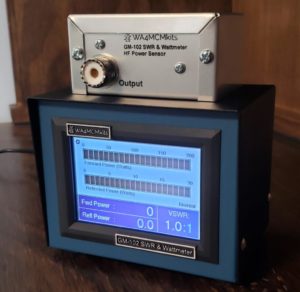
The kit that first caught my eye was that SWR/Watt Meter by WA4MCMKits. The GM-102 SWR & Wattmeter kit comes complete with all parts, PC board, enclosure, display screen, and
the sensor that goes in line with the transceiver antenna connector and your antenna coax. It has an advantage of being connected to the main unit by a 6 ft cable so the display can be placed without the coax needing to be connected directly to it.
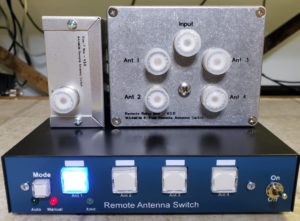
WA4MCMKits also makes 4 and 8 channel remote antenna switches as well. I have built both the GM-103 and their 4 port remote antenna switch and the thrill is back! Both
kits come with detailed assembly manuals with photos and diagrams to make the construction quite easy. The components are all “thru-hole” on the PC board, the PC board is silkscreened on both sides, and the assembly of the kits in their respective enclosures is well documented.
The actual build does require some familiarity with basic tools and a soldering iron. The assembly instructions start with taking an inventory of all pieces and parts. Then the construction begins with placing the components on the PC board by groups, soldering them to their “pads” and then clipping the leads flush with the bottom of the board. Mounting switches, connectors, and displays or indicators follow. Careful examination of the assembled components is required to ensure that all components are properly soldered and connectors connected before going on to the test and calibration steps. Take these one at a time and make sure that the result is what you expect and what the instructions call for. Once power is first applied and indicators are checked and system is calibrated (if required), final assembly cam be done.
There is nothing more rewarding to look at the finished product with its glowing indicators and
panels to know that you built it. In most cases the project will be much cheaper to build and be as functional (in many cases better than) a factory-made unit.
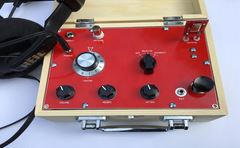
I have also recently built a QRP 40 meter, crystal controlled, CW transceiver that was a joy to assemble. It is called the Bayou Jumper and harkens back to an old WWII “Spy” radio but with a modern twist. Not perhaps for the novice builder but not that bad with patience and careful
attention to detail. The instructions also suggest a small wooden enclosure conveniently available from Hobby Lobby. I finished mine in a dark walnut stain with a few coats of poly and it looks fantastic.
So, the Thrill of the Build still lives! Over the years I have built many, many ‘store-bought’ kits
and a few of my own. There really is a thrill when you first turn it on and it works! Long live the kits!
Other Amateur Radio Manufacturers of Kits
Midway Electronics – http://www.midwayelectronics.us/qrp/index.html
They offer three QRP kits: ME Series QRP Transceivers ME40+ ME80+ ME30+. The kits come with above average documentation and a (quote) “No B.S. Warranty”.
EMTECH – http://steadynet.com/emtech/
NW Series Monoband CW Transceiver (80, 40, 30, 20 meters) and ZM-2 ATU (Antenna Tuning Unit)
FiveDashInc – http://fivedash.com/
Home of the famous SoftRock family of software defined ham radio QRP RCVR and XCVR kits.
Bliss Radio QRP Kits – http://www.nitehawk.com/blissradio/
QRPme – http://www.qrpme.com/
Rex, W1REX, is a one-man part-time business operator. He offers QRP transceivers, receivers and transmitters and fun accessories. Home of the “The ‘Rock-Mite’ Transceiver ” – A Simple CW transceiver for 80,40,30 or 20 Meters.
HamCrafters – http://www.hamcrafters.com/
Makers of electronic keyer kits since 1997.
Radio Kits Co. UK – http://www.radio-kits.co.uk/
Makers of the Hunter – SDR Receiver / Panadapter and MKARS80 Transceiver kit.
Spectrum Communications – http://www.spectrumcomms.co.uk/Amateur.htm
A source of unique kits for amateur radio. Worth investigating.
KitsAndPartsDotCom – http://www.kitsandparts.com/
They offer RF toolkits that are designed to be electronic building blocks. Think of these small kits as a “QRP Erector Set”.
Quasar Electronics – http://www.quasarelectronics.co.uk/
Almost 300 kits to choose from. For hobbyists, education and industrial applications
SOTABEAMS – http://www.sotabeams.co.uk/
They make amateur radio antennas and kits “for the great outdoors”.
Nightfire Electronics Kits – https://vakits.com/catalog/ham-radio-kits

